
Score Card
Hole # 1
Your round begins with one of the more straightforward par 4s at Muttontown. The fairway is wide – there is a fairway bunker approximately 230 yards out from the Blue tees that will catch some tee shots. Approach shots will find a large green that is protected by three bunkers and a false front. A common theme at the club is to play to the middle of the green or leave it a little short – going over this green can lead to a big number.
| Yardage | ||||
|---|---|---|---|---|
|
Black/Gold 341 |
Blue 323 |
White 311 |
Red 305 |
Family 206 |
|
Handicap (M/L) 13/11 Par 4 |
||||
Hole # 2
The second hole features a blind tee shot for the men; the ladies’ tee is elevated and they can see the fairway. The fairway is wide, but if you miss, you do not want to miss right. The driveway leading to the clubhouse runs along the tree line on the right side of the hole – if you slice it too far right, you’ll be faced with a tough recovery shot. The green is longer than it is wide – if your approach is straight, you can get away with hitting it a little short or long. However, you don’t want to go over – you’ll be fetching your ball from underneath someone’s car in the parking lot.
| Yardage | ||||
|---|---|---|---|---|
|
Black/Gold 378 |
Blue 362 |
White 347 |
Red 295 |
Family 221 |
|
Handicap (M/L) 9/17 Par 4 |
||||
Hole # 3
This par 4 (par 5 for the ladies) runs parallel to hole 2. Your tee shot is important here – the driveway runs along the right side of the hole and the woods on the left tend to swallow up any bad tee shots. Your second shot is not easy, either – the fairway slopes downhill and there is a bunker in the middle of the fairway approximately 30 yards in front of the green. The green is protected by bunkers and once again, you don’t want to go over. Whatever distance you have into the green, play a club short. The downhill approach is more severe than you think.
| Yardage | ||||
|---|---|---|---|---|
|
Black/Gold 443 |
Blue 426 |
White 406 |
Red 415 |
Family 262 |
|
Handicap (M/L) 3/5 Par 4/5 |
||||
Hole # 4
Players are greeted with a relatively straightforward par 3. It’s the longest one on the course, so players that opt to use clubs such as a 3 wood or driver must keep their tee shot down the middle. There are two greenside bunkers in front of the green that will catch any shots that fade or hook just a little bit.
| Yardage | ||||
|---|---|---|---|---|
|
Black/Gold 201 |
Blue 186 |
White 173 |
Red 164 |
Family 99 |
|
Handicap (M/L) 11/9 Par 3 |
||||
Hole # 5
A short par 4 with a blind tee shot greets you after the par 3. You can hit driver if you’d like – however, it’s not necessary as the hole is only 300 yards long and downhill. Longer hitters can opt for mid-irons to leave themselves with a wedge into a small green. The green is flat and most putts won’t break much, except near the back edge/back left corner of the green. Accuracy is a must on your approach shot – numerous bunkers guard this small green. Get it on the putting surface and you’ll have a good chance at a birdie.
| Yardage | ||||
|---|---|---|---|---|
|
Black/Gold 332 |
Blue 316 |
White 306 |
Red 299 |
Family 178 |
|
Handicap (M/L) 17/13 Par 4 |
||||
Hole # 6
This par 4 may only be 405 yards from our blue tees, but it feels a lot longer since the tee shot must carry a severe uphill slope. If you don’t carry the tee shot up the hill, your ball will come back a bit and roll off to the right side of the fairway. Longer hitters can carry the hill with ease and a slight fade (right-handed) or slight draw (left-handed) is the preferred ball flight on this tee shot. Once up the hill, the hole is flat as can be and if you’re approaching this green, you would rather be short than left, right, or long. The green is relatively flat, and most putts won’t feature much break.
| Yardage | ||||
|---|---|---|---|---|
|
Black/Gold 421 |
Blue 405 |
White 392 |
Red 327 |
Family 192 |
|
Handicap (M/L) 7/3 Par 4 |
||||
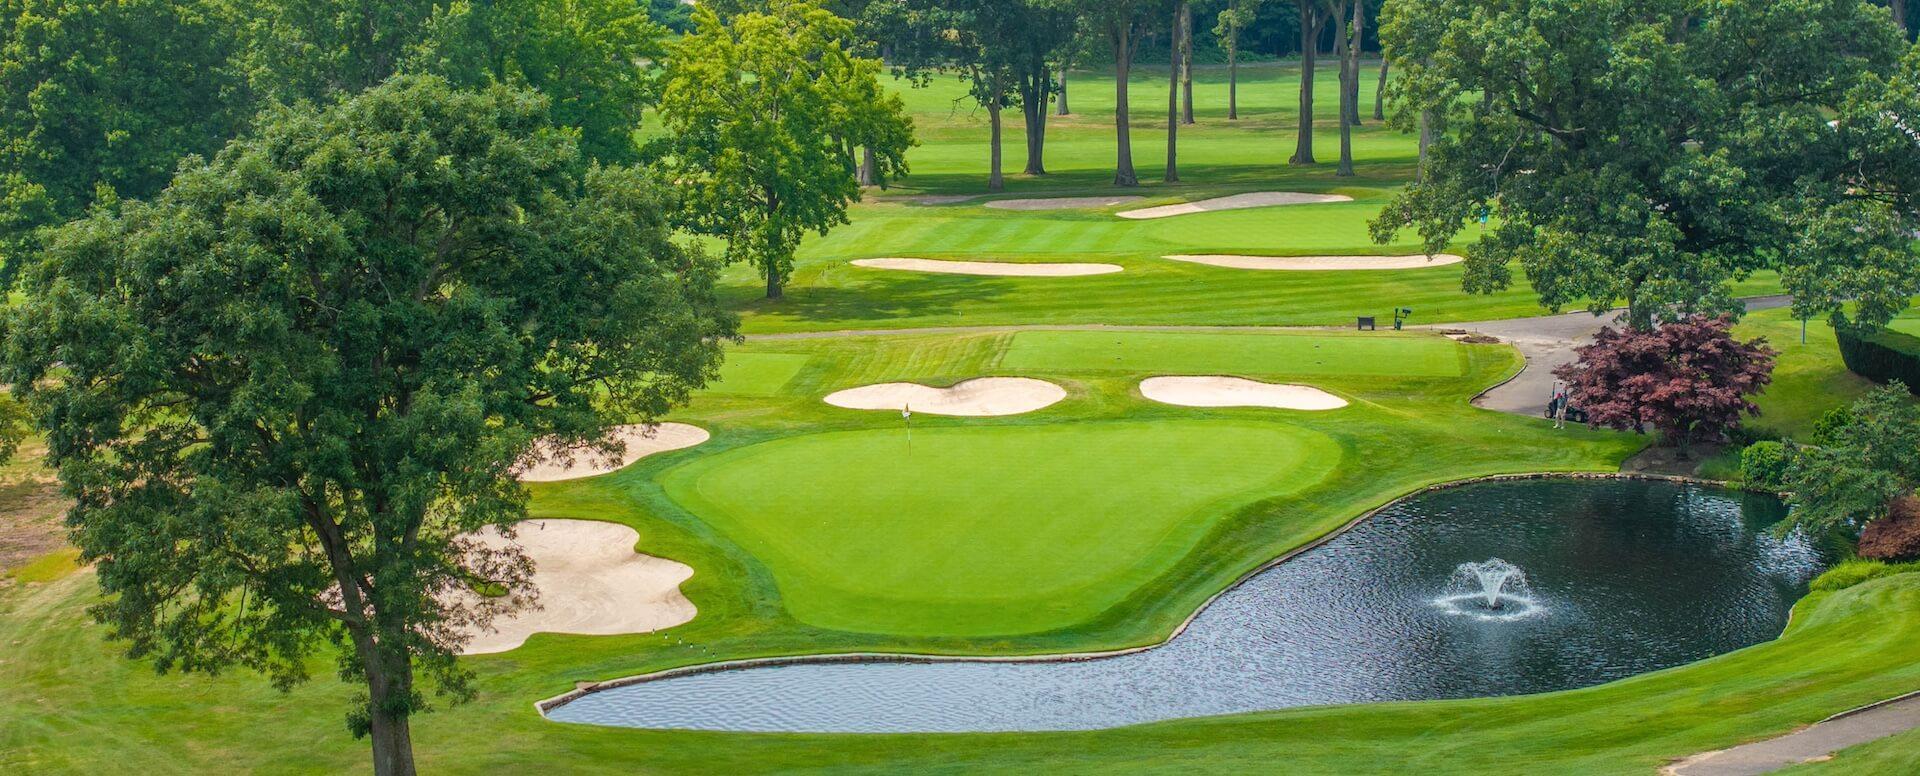
Hole # 7
This par 3 is the shortest one on the course. One of Muttontown’s two water hazards sits in front of the green. Most players will be using one of their shorter clubs for this one. Forget about the water and put a good swing on it – aim for the middle and you’ll have a good look at birdie.
| Yardage | ||||
|---|---|---|---|---|
|
Black/Gold 149 |
Blue 131 |
White 120 |
Red 115 |
Family 56 |
|
Handicap (M/L) 15/15 Par 3 |
||||
Hole # 8
This par 5 starts with an elevated tee shot to a wide fairway. There is a fairway bunker on the right side of the fairway as well as a fairway bunker on the left side of the fairway. Longer hitters - avoid these and you’ll have a good opportunity to get home in two. Your second shot will be blind, as the fairway severely slopes upward approximately 200 yards out from the green. This green is long, but tricky. The back section slopes towards the middle of the green, and the left side of the green heads towards the rough.
| Yardage | ||||
|---|---|---|---|---|
|
Black/Gold 531 |
Blue 505 |
White 498 |
Red 467 |
Family 308 |
|
Handicap (M/L) 1/1 Par 5 |
||||
Hole # 9
A short par 4 where driver is not needed on your tee shot. There are trees down the right and fairway bunkers on the left. The fairway is wider than you think, so aim down the right center and you want to hit anywhere from 200-250 yards to be safe. The second water hazard at Muttontown wraps around the front and right side of this green, so your short iron into the green must be hit solidly. This green is two-tiered; the front section is narrow and the back section is wider.
| Yardage | ||||
|---|---|---|---|---|
|
Black/Gold 345 |
Blue 322 |
White 307 |
Red 283 |
Family 196 |
|
Handicap (M/L) 5/7 Par 4 |
||||
Hole # 10
A dogleg right starts your back nine. The fairway is wide for the shorter hitters – longer hitters can try to cut the corner and must play a fade if they want to keep it in the fairway. Your approach into this large green is downhill, so take that into consideration when you’re picking your club. The green slopes from back to front, so leave yourself an uphill putt to give yourself a good look at birdie.
| Yardage | ||||
|---|---|---|---|---|
|
Black/Gold 415/389 |
Blue 374 |
White 359 |
Red 346 |
Family 217 |
|
Handicap (M/L) 12/12 Par 4 |
||||
Hole # 11
This par 4 is straight as an arrow – it’s the green that causes the problems here. Approaches into this green are not easy – there is a severe slope in front of the green that will catch short shots and “spinny” wedges. The left side of the green has a severe slope from back to front. The right side of the green has a bowl that makes it tough to stop your putt if you’re putting from the middle of the green. Get out of this hole with a two-putt and you’ll be feeling great.
| Yardage | ||||
|---|---|---|---|---|
|
Black/Gold 407 |
Blue 384 |
White 377 |
Red 371 |
Family 204 |
|
Handicap (M/L) 6/4 Par 4 |
||||
Hole # 12
A par 5 that starts with a blind tee shot down the hill. The fairway is wider than you think, so feel confident stepping up to this tee shot. It’s incredibly difficult to hit this green in two, so take an iron or hybrid and hit your layup shot left of the fairway bunker that sits at the top of the hill on the right. Hit your approach to the middle of the green to avoid any of the greenside bunkers, especially the back bunker. Most putts won’t break a lot, a good opportunity for birdie on this one.
| Yardage | ||||
|---|---|---|---|---|
|
Black/Gold 556/538 |
Blue 513 |
White 496 |
Red 466 |
Family 280 |
|
Handicap (M/L) 2/2 Par 5 |
||||
Hole # 13
Another par 4 that is “only” 400 yards, but feels a lot longer. The fairway is wide and features a slight bend to the left. Avoid the fairway bunkers on the right so you don’t have to hit a 200+ yard fairway bunker shot to a narrow green. The green is long and you want to be putting from the sides of this green. It doesn’t look too severe, but putts from the back of the green get down the slope in a hurry.
| Yardage | ||||
|---|---|---|---|---|
|
Black/Gold 465/416 |
Blue 400 |
White 334 |
Red 330 |
Family 227 |
|
Handicap (M/L) 8/10 Par 4 |
||||
Hole # 14
This par 3 isn’t too long and features a large green – that doesn’t mean it’s easy. There are bunkers to the left, right, and behind the green. Short of the green and you’re chipping/putting up a steep slope. If you knock your tee shot too far right – you’ll once again be retrieving your ball from under someone’s car!
| Yardage | ||||
|---|---|---|---|---|
|
Black/Gold 155 |
Blue 137 |
White 124 |
Red 118 |
Family 49 |
|
Handicap (M/L) 16/18 Par 3 |
||||
Hole # 15
The shortest par 4 on the course is a dogleg left that has a partially blind tee shot. You should take whatever club you hit 200-230 and aim it over the right side of the fairway bunker on the left. Approach shots into this green are key – there are multiple slopes on this green, make sure you take the correct wedge. It’s also slightly downhill hitting into this green, so keep that in mind when picking your wedge.
| Yardage | ||||
|---|---|---|---|---|
|
Black/Gold 311 |
Blue 297 |
White 291 |
Red 286 |
Family 181 |
|
Handicap (M/L) 14/14 Par 4 |
||||
Hole # 16
Another par 3, this time a little bit longer than hole 14. Your tee shot is uphill, so make sure you add an extra club when taking one out of the bag. The green slopes from back to front, so don’t hit your tee shot over. There’s a bunker back there and it’ll be near impossible to hit that shot close to the pin.
| Yardage | ||||
|---|---|---|---|---|
|
Black/Gold 166 |
Blue 145 |
White 132 |
Red 122 |
Family 51 |
|
Handicap (M/L) 18/16 Par 3 |
||||
Hole # 17
The last par 5 at Muttontown has one of the prettier tee shots you’ll see during your round. Starting back in the trees, player’s tee shots should favor the left side of the fairway. Any shots left or right off the tee can cause trouble when trying to recover. Longer hitters can go for this green in two – however, it’s a two-tiered green with lots of bunkers surrounding it. The green slopes from back to front, so you don’t want to hit your approach too far. Try to keep your ball below the hole if possible.
| Yardage | ||||
|---|---|---|---|---|
|
Black/Gold 529 |
Blue 513 |
White 489 |
Red 473 |
Family 285 |
|
Handicap (M/L) 10/8 Par 5 |
||||
Hole # 18
This par 4 features a slight dogleg to the left and an uphill approach to the green. Tee shots should favor the right side of the fairway; longer hitters can aim towards the right edge of the bunkers on the left and carry it passed the dogleg. Add a club when approaching this green but be careful – our back patio is behind this green. Don’t want to finish your round apologizing for ruining someone’s dinner! This green slopes from back to front, so try to leave your approach below the hole.
| Yardage | ||||
|---|---|---|---|---|
|
Black/Gold 406 |
Blue 392 |
White 373 |
Red 368 |
Family 194 |
|
Handicap (M/L) 4/6 Par 4 |
||||
